Tiếp tục về blade template trong Laravel. Bài này mình sẽ giới thiệu với mọi người về layout trong Blade template.
4. Nhúng view khác vào trong Blade.
@include
Blade template cho phép bạn có thể include các view khác vào trong view hiện tại một cách đơn giản bằng việc sử dụng @include directive. Lúc này ở các view được nhúng cũng có thể sử dụng được tất cả các biến có trong view hiện tại.
VD: Giả sử mình có 2 view với path và code như sau:
- resources/views/shared/notify.blade.php
<div class="alert">{{ $alertMessage }}</div>
- resources/views/home.blade.php
<h1>{{ $title }}</h1>
@include('shared.notify')
- routes/web.php
use Illuminate\Support\Facades\Route;

Route::get('/', function () {
    return view('home', ['title' => 'Toidicode.com', 'alertMessage' => 'Thong bao day']);
})->name('home');
Kết quả: Mình sẽ để ở dạng views-source cho mọi người dễ xem.
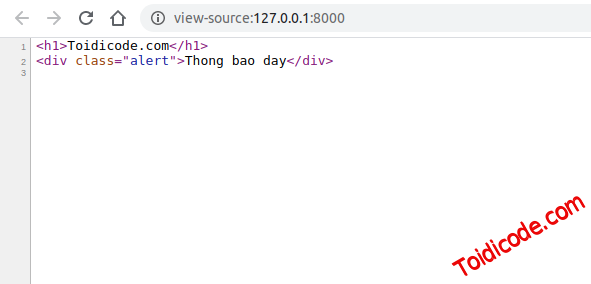
Ở ví dụ trên trong view notifi.blade.php mình đã sử dụng biến $alertMessage được truyền vào trong view home.blade.php
Trong trường hợp bạn muốn đưa thêm data vào trong view được include thì bạn có thể sử dụng cú pháp sau:
@include('view.name', [$variableName => $data])
Trong đó:
$variableNamelà tên biến chưa data bạn muốn truyền vào subviews.$datalà giá trị của$variableName.
VD: Mình sẽ thêm alert type vào trong view notify.blade.php.
- resources/views/shared/notify.blade.php
<div class="alert {{ $alertType }}">{{ $alertMessage }}</div>
- resources/views/home.blade.php
<h1>{{ $title }}</h1>
@include('shared.notify', ['alertType' => 'alert-warning'])
- routes/web.php
use Illuminate\Support\Facades\Route;

Route::get('/', function () {
    return view('home', ['title' => 'Toidicode.com', 'alertMessage' => 'Thong bao day']);
})->name('home');
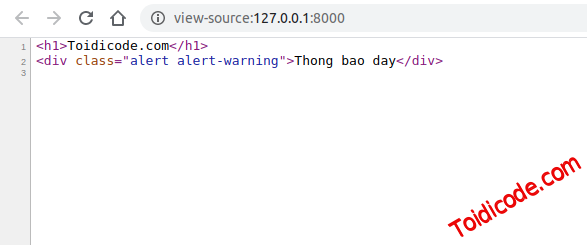
Kết quả: Mình sẽ để ở dạng views-source cho mọi người dễ xem.
@includeIf
Trong blade template nếu bạn @include một view không tồn tại thì Laravel sẽ throw ra một error. Nếu bạn muốn bỏ qua exception đó thì bạn có thể dùng @includeIf. Directive này sẽ check nếu như view tồn tại thì mới thực thi việc include view.
Còn cách sử dụng thì tương tự như đối với @include.
VD: resources/views/home.blade.php
<h1>{{ $title }}</h1>
@includeIf('shared.notify', ['alertType' => 'alert-warning'])
@includeWhen
Trong một số trường hợp bạn muốn kiểm tra điều kiện trước khi nhúng view thì bạn có thể sử dụng @includeWhen với cú pháp:
@includeWhen($boolean, 'view.name', $data)
Trong đó: $boolean trả về true thì view sẽ được include và ngược lại false thì view sẽ không được include.
@includeUnless
Đây là directive phủ định của @includeWhen. Nghĩa là $boolean trả về true thì view sẽ không được include và ngược lại false thì view sẽ được include.
Cú pháp:
@includeUnless($boolean, 'view.name', $data)
@includeFirst
Directive này cho phép chúng ta truyền vào một list view. Và nó sẽ kiểm tra xem nếu view nào tồn tại đầu tiên trong list thì nó sẽ nhúng view đó. Các view phía sau sẽ không được nhúng nữa.
Cú pháp:
@includeFirst(['view.name', 'view.name1', 'view.name2'], $data)
Nhúng view trong vòng lặp.
Bạn cũng có thể nhúng view qua mỗi lần lặp một mảng hay một collection trong Blade template với directive @each với cú pháp:
Trong đó:
view.namelà view bạn muốn nhúng vào view hiện tại.$arraylà mảng, collection data bạn muốn lặp.itemlà giá trị sẽ được assign qua mỗi lần lặp.view.emptylà view sẽ được nhúng khi$arraytrống. Giá trị này có thể bỏ qua.
VD:
- resources/views/shared/post.blade.php
<div class="post-item">
    <h3>{{ $post['name'] }}</h3>
</div>
- resources/views/home.blade.php
<h1>List Post</h1>
<div class="list-post">
    @each('shared.post', $posts , 'post')
</div>
- routes/web.php
use Illuminate\Support\Facades\Route;

Route::get('/', function () {
    $posts = [
        ['name' => 'Post 1'],
        ['name' => 'Post 2'],
        ['name' => 'Post 3'],
        ['name' => 'Post 4'],
    ];

    return view('home', ['posts' => $posts]);
})->name('home');
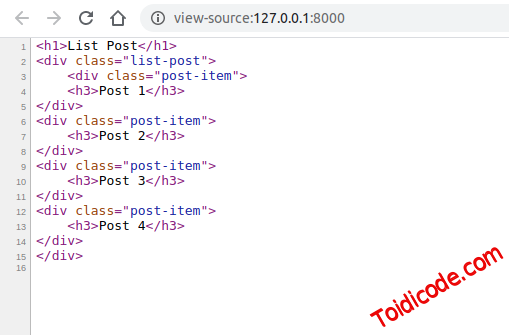
Kết quả:
@once
Directive này cho phép chúng ta thực thi hành động bên trong nó một lần duy nhất khi render view. Ví dụ có 2 chỗ cùng nhúng một đoạn code nếu như sử dụng directive @once thì các đoạn code phía sau once đầu tiên được thực sẽ không được thực thi nữa.
VD:
@once
    @push('scripts')
        <script>
            // Your custom JavaScript...
        </script>
    @endpush
@endonce
5. Xây dựng layout sử dụng component trong Blade.
Hầu hết các ứng dụng web hiện này đều phân chia bố cục theo các layout riêng rồi ghép chúng lại với nhau khi cần sử dụng đến. Làm như thế khiến cho code phần view sẽ dễ đọc hơn, dễ maintenance hơn.
Trong Blade template, Laravel cũng hỗ trợ chúng ta xây dựng ra các component riêng rồi nhúng nó vào khi cần dùng một cách rất đơn giản.
Định nghĩa component trong Blade template.
Để khai báo một component cơ bản trong Laravel các bạn chỉ cần khai báo chúng ở trong path resources/views/components
VD: Mình sẽ khai báo component resources/views/components/todo.blade.php.
<html>
<head>
    <title>{{ $title ?? 'Todo Manager' }}</title>
</head>
<body>
<h1>Todos</h1>
<hr/>
{{ $slot }}
</body>
</html>
Trong đó: $slot là nơi sẽ hiện thị nội dung truyền vào component khi chúng được gọi ở view khác.
Gọi component trong Blade template
Sau khi đã khai báo được component, giờ nếu bạn muốn gọi chúng ở trong view thì có thể sử dụng cú pháp sau:
<x-componentname>...</x-componentname>

// Hoặc

<x-componentname/>
Trong đó: componentname là tên file component bạn muốn gọi.
VD: Mình sẽ gọi và render component todo.blade.php ở trên.
- resources/views/home.blade.php
<x-todo>
    @foreach ($tasks as $task)
        <h3>{{ $task['name'] }}</h3>
    @endforeach
</x-todo>
- routes/web.php
use Illuminate\Support\Facades\Route;

Route::get('/', function () {
    $tasks = [
        ['name' => 'Task 1'],
        ['name' => 'Task 2'],
        ['name' => 'Task 3'],
        ['name' => 'Task 4'],
    ];

    return view('home', ['tasks' => $tasks]);
})->name('home');
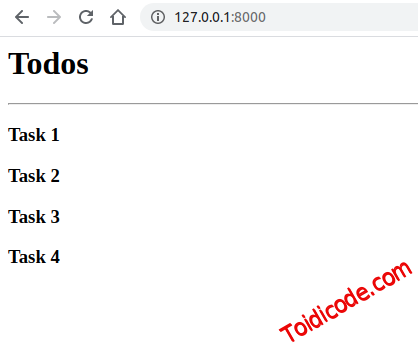
Kết quả:
Trong một số trường hợp bạn muốn truyền data vào cho $title trong todo.blade.php thì bạn sử dụng cú pháp như sau:
<x-slot name="VariableName">
    Data
</x-slot>
Trong đó:
VariableNamelà tên biến trong component bạn muốn truyền data vào.Datalà dữ liệu bạn muốn truyền vào.
VD: Mình sẽ bind title vào trong component todo.blade.php ở trên.
- resources/views/home.blade.php
<x-todo>
    <x-slot name="title">
        Custom Title
    </x-slot>
    @foreach ($tasks as $task)
        <h3>{{ $task['name'] }}</h3>
    @endforeach
</x-todo>
Kết quả:
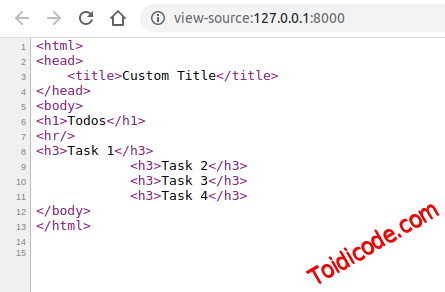
Như các bạn đã thấy thì title đã được thay đổi.
Đăng ký nhận tin.
Chúng tôi chỉ gửi tối đa 2 lần trên 1 tháng. Tuyên bố không spam mail!


<script>alert("hi")</script>
2 năm trước