Ở các phần trước mình đã giới thiệu với mọi người khởi tạo một con server và đọc ghi file trong node.js. Thì ở bài này chúng ta sẽ áp dụng 2 module đó cộng với 1 module nữa (mình sẽ giới thiệu ở dưới) để thực hiện chức năng upload file trong node.js.
1, Tổng Quan.
- Để thực hiện được chức năng này thì mọi người cần phải có các kiến thức sau:
- module http trong node.js (link).
- module fs trong node.js (link).
- module formidable - Đây là một module dùng để phân tích dữ dữ liệu từ form gửi lên, đặc biệt là với tệp tin.
-Module formidable không được tích hợp sẵn vào trong node.js nên để có thể sử dụng được thì các bạn cần phải tải nó về bằng npm.
Cú Pháp:
npm install -s formidable
- Ứng dụng chuẩn bị xây dựng của chúng ta sẽ có cấu trúc thư mục như sau:
|-node_modules/
|-uploads/
|-index.html
|-server.js
2, Viết code upload.
-Đầu tiên thì chúng ta cần viết code để khởi tạo server (ở đây mình sử dụng module http và cho web chạy ở port 8000).
File server.js:
var http = require('http');
http.createServer(function (req, res) {
    //code
}).listen(8000);
-Tiếp đó chúng ta cần tạo ra một file chứa code html form (ở đây mình đặt là index.html nằm cùng cấp với file server.js)
Code:
<!DOCTYPE html>
<html>
<head>
    <meta charset="utf-8">
    <meta http-equiv="X-UA-Compatible" content="IE=edge">
    <title>Upload file in node.js - Toidicode.com</title>
    <link rel="stylesheet" href="//netdna.bootstrapcdn.com/bootstrap/3.1.1/css/bootstrap.min.css">
</head>
<body>
    <div class="container">
        <div class="row">
        <div class="col-sm-8 col-sm-offset-2" style="margin-top: 50px;">
                <div class="panel panel-info">
                    <div class="panel-heading">
                        <h3 class="panel-title">Toidicode.com</h3>
                    </div>
                    <div class="panel-body">
                        <form action="upload" method="POST" enctype="multipart/form-data">
                            <legend>Upload file</legend>
                            <div class="form-group">
                                <label for="">File</label>
                                <input type="file" class="form-control" name="files">
                            </div>
                            <button type="submit" class="btn btn-primary">Submit</button>
                        </form>
                    </div>
                </div>
            </div>
        </div>
    </div>
</body>
</html>
-Sau khi chúng ta đã tạo xong view rồi, thì việc tiếp tục chúng ta cần làm là dùng module fs để render file view đó ra trên server.
Code:
var http = require('http');
var fs = require('fs');

http.createServer(function (req, res) {
    //xét header cho request
    res.writeHead('200', {'Content-Type': 'text/html'});
    //Đọc file index và trả về dữ liệu
    fs.readFile('index.html', 'utf8', function (err, data) {
        //nếu nỗi thì thông báo
        if (err) throw err;
        //không lỗi thì render data
        res.end(data);
    })
}).listen(8000);
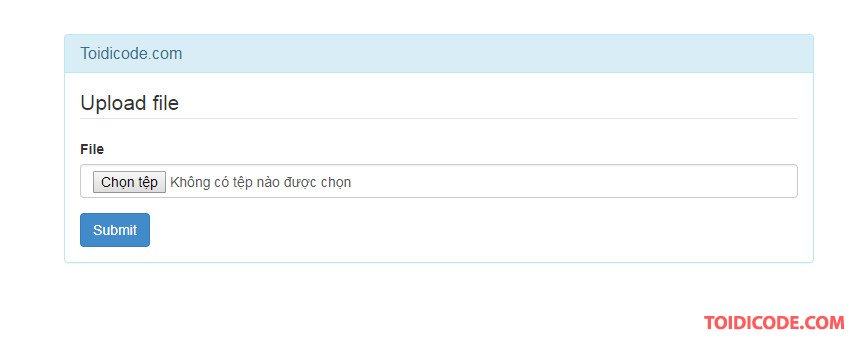
Lúc này chúng ta chạy server lên thì kết quả sẽ được như hình.

-Bây giờ trên file server.js chúng ta sẽ tiếp tục require module formidable vào để viết code xử lý upload.
var http = require('http');
var fs = require('fs');
var formidable = require('formidable');

http.createServer(function (req, res) {
    //Nếu request là uplooad và method là post
    if (req.url === '/upload' && req.method.toLowerCase() === 'post') {
        //Khởi tạo form
        var form = new formidable.IncomingForm();
        //Thiết lập thư mục chứa file trên server
        form.uploadDir = "uploads/";
        //xử lý upload
        form.parse(req, function (err, fields, file) {
            //path tmp trên server
            var path = file.files.path;
            //thiết lập path mới cho file
            var newpath = form.uploadDir + file.files.name;
            fs.rename(path, newpath, function (err) {
                if (err) throw err;
                res.end('Upload Thanh cong!');
            });
        });
        return;
    }
    //xét header cho request
    res.writeHead('200', {'Content-Type': 'text/html'});
    //Đọc file index và trả về dữ liệu
    fs.readFile('index.html', 'utf8', function (err, data) {
        //nếu nỗi thì thông báo
        if (err) throw err;
        //không lỗi thì render data
        res.end(data);
    })
}).listen(8000);
-Lúc này các bạn chạy lại server và hưởng thụ kết quả!
3, Lời kết.
-Phần này mình không nói sâu về formidable module như giới hạn dung lượng của file,... Nếu như các bạn cần thì có thể tham khảo thêm tại link
Đăng ký nhận tin.
Chúng tôi chỉ gửi tối đa 2 lần trên 1 tháng. Tuyên bố không spam mail!


0 Comments